Blogger Tricks Blogger Templates

http://meng-kimtong.blogspot.com/

Natural Natural In Computer Lab In Computer Lab My Address: Street 11,05 Village,Sangkat Kampong Leav,Krong Prey Veng,Prey Veng Province,National road 11, (Prey Veng 14553 ),Cambodia
Headlines
Breaking News
Welcome for your visiting my Blogspot,Please have a good luck all time! ©

Thursday, March 10, 2016

Ant Dictionary

របៀបបញ្ចូល វចនានុក្រម Ant ដោយមិនបាច់តម្លើងដោយផ្ទាល់

How to install Ant Dictionary without installing


១-សម្រាប់ ANT Dictionary 2010 V1.02

 -អ្នកអាចថតចម្លងពីម៉ាស៊ីនផ្សេងដែលបានតម្លើងវារួច នូវថតឯកសារចំនួន៤ តាមរូបភាព
ខាងក្រោម ពីទីតាំង  C:\Users\USER ACCOUNT NAME\AppData\Roaming
(ឧទាហរណ៍ សម្រាប់ម៉ាស៊ីនខ្ញុំ គឺ C:\Users\MENG KIMTONG\AppData\Roaming)
យកទៅដាក់ក្នុងម៉ាស៊ីនរបស់អ្នក តាមទីតាំង ឈ្នោះគណនីម៉ាស៊ីនរបស់អ្នក ដូចដែលអ្នកបានថតវាចេញដែរ។


ខ-បន្ទាប់ពីបានថតចម្លងរួចសូម ចូលទៅថតចម្លង ថតឯកសារ ANT Dictionary 2010 V1.02ពីទីតាំងមួយទៀត ៖
    -បើម៉ាស៊ីន 64 bit ទីតាំងវាគឺ  C:\Program Files (x86) រួចរកមើល ថតឯកសារ ANT Dictionary 2010 V1.02ដើម្បីថតចម្លងចូលម៉ាស៊ីនរបស់អ្នកដូចគ្នាដែរ។
   -បើម៉ាស៊ីន 32 bit ទីតាំងវាគឺ   C:\Program Files រួចរកមើល ថតឯកសារ ANT Dictionary 2010 V1.02ដើម្បីថតចម្លងចូលម៉ាស៊ីនរបស់អ្នកដូចគ្នាដែរ។
 
 
2-សម្រាប់ ANT Dictionary 2011 V2

 -អ្នកអាចថតចម្លងពីម៉ាស៊ីនផ្សេងដែលបានតម្លើងវារួច នូវថតឯកសារចំនួន១ តាមរូបភាព
ខាងក្រោម ពីទីតាំង  C:\Users\USER ACCOUNT NAME\AppData\Roaming
(ឧទាហរណ៍ សម្រាប់ម៉ាស៊ីនខ្ញុំ គឺ C:\Users\MENG KIMTONG\AppData\Roaming)
យកទៅដាក់ក្នុងម៉ាស៊ីនរបស់អ្នក តាមទីតាំង ឈ្នោះគណនីម៉ាស៊ីនរបស់អ្នក ដូចដែលអ្នកបានថតវាចេញដែរ។


ខ-បន្ទាប់ពីបានថតចម្លងរួចសូម ចូលទៅថតចម្លង ថតឯកសារ ​​ANT Magazine ពីទីតាំងមួយទៀត ៖
    -បើម៉ាស៊ីន 64 bit ទីតាំងវាគឺ  C:\Program Files (x86) រួចរកមើល ថតឯកសារ ANT Magazineដើម្បីថតចម្លងចូលម៉ាស៊ីនរបស់អ្នកដូចគ្នាដែរ។
   -បើម៉ាស៊ីន 32 bit ទីតាំងវាគឺ   C:\Program Files រួចរកមើល ថតឯកសារ ​​ANT Magazineដើម្បីថតចម្លងចូលម៉ាស៊ីនរបស់អ្នកដូចគ្នាដែរ។


Sunday, March 6, 2016

Using CMD to create bootable Windows USB drive

របៀបបង្កើតផ្លាសប៊ូត ជាមួយ CMD (command prompt )

How to create a bootable Windows USB drive With CMD
To make a bootable USB drive for Windows Vista or Windows 7, 8,8.1 and 10 ,you need to have
       1-Windows iso Files type (image files)
       2-USB drive with capacity  8 Gb


  Then follow each step below:
1-Plug in USB drive to your computer

2-Open Windows command line window by clicking Start, typing in cmd in the search and select Run as Administrator by press

then press YES

 
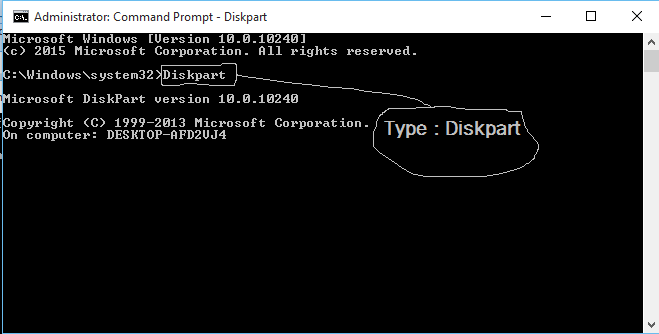
3-type DISKPART, then  press Enter

 
4-Type LIST DISK and press Enter.


5-Find the disk number of your USB drive  type SELECT DISK [USB disk #]
(for my picture is Disk 1)
 
6-CLEAN
 

7-CREATE PARTITION PRIMARY


8-SELECT PARTITION 1

9-ACTIVE
 
10-FORMAT FS=NTFS   (please wait until It finishes)
 
11-ASSIGN
 
12-EXIT
 
13-Mount the Windows ISO File to the virtual drive / insert Windows DVD  into CD room drive 
 
14-Go back to the command prompt window and type in D: CD BOOT (substitute your DVD drive letter for "D:" / Virtual drive ) and press Enter. Type CD BOOT again and press Enter.
 
15-type BOOTSECT.EXE /NT60 H: (substitute your USB flash drive letter for "H:"
 

16- Copy All Files in the Windows iso into your USB drive
 
17- Try boot your USB to set up window


Thursday, March 3, 2016

Rufus Create bootable USB drives


បង្កើត​ផ្លាសប៊ូតវីនដូជាមួយនឹង Rufus

 
Create bootable USB drives the easy way with RUFUS
កម្មវិធី​ ជាកម្មវិធីដែលពិសេសជាងកម្មវិធីផ្សេងៗទៀតក្នុងការបង្កើតនូវ ផ្លាសប៊ូតប្រព័ន្ធប្រតិបត្តិការដែលលឿនជាងកម្មវិធីដ៏ទៃទៀត


Download

 
Windows 7 USB/DVD Download Tool v1.0.3000:08:10
Universal USB Installer v1.8.7.500:07:10
UNetbootin v1.1.1.100:06:20
RMPrepUSB v2.1.63800:04:10
WiNToBootic v1.200:03:35
Rufus v1.1.100:03:25
 

Wednesday, March 2, 2016

Ace Utilities Version: 6.1.0

កម្មវិធី Ace Utilities  V.6.1.0

Ace Utilities ជាកម្មវិធីសម្រាប់ធ្វើឲ្យកុំព្យូទ័ររបស់អ្នក ដើរលឿន វាអាចបង្កើនល្បឿន សម្អាត និង​ ធ្វើឲ្យកុំព្យូទ័ររបស់អ្នកមានតុល្យភាព


1-->Download

2--->Download


Saturday, February 27, 2016

how to make alternate color Rows and Column in excel

How to make alternate color Rows or Column  in excel
It I how to shade every other row or Column in Excel    by using the "Conditional Formatting" follow these steps:
  1. Open the worksheet.
  2. Select the cell range of your rows or columns that you want to shade, .
  3. Click the Home tab.
  4. In the Styles group, click Conditional Formatting, and then click Manage Rules.
  5. Click New rule.
  6. Click Use a formula to determine which cells to format.
  7. In the Format values where this formula is true box, type =MOD(ROW(),2), and then click Format.
  8. On the Fill tab, click the color that you want to use to shade every other row, and then click OK.
  9. Click OK to close the New Formatting Rule dialog box.
  10. Click Apply, and then click OK to close the Conditional Formatting Rules Manager dialog box.

Thursday, February 25, 2016

EaseUS Partition Master 10.8


EaseUS Partition Master 10.8 All Editions Serial Keys 

កម្មវិធីកាត់ចំណែកភាគ ថាសរឹង ថាសអង្គចងចាំ បម្លែង ប្រព័ន្ធឯកសារ

ទាញយក--->Download  (Professional Edition )

download EUS10x-REG.exe  first and run it wizardly to get EUS10x-REG.rar for Crack /Serial key all versions


EaseUS Partition Master : is All In One partition solution and disk management utility. It allows you to extend partition (especially for system drive), manage disk space easily, settle low disk space problem on MBR and GUID partition table (GPT) disk.

EaseUS Partition Master Features :
-Resize Or Move partition.
-Extend system drive.
-Copy disk & partition.
-Merge partition.
-Split partition.
-Redistribute free space.
-Convert dynamic disk.
-Recover partition.
 You can activate all versions with the reg file by copy the version that you need and save it as reg file All Versions

1-Activate Unlimitted Edition x86.reg
Windows Registry Editor Version 5.00
[HKEY_LOCAL_MACHINE\SOFTWARE\EASEUS\EPM\Key]
"Key"="www.PirateCity.NET"
[HKEY_LOCAL_MACHINE\SOFTWARE\EASEUS\EPM\Version]
"Flag"="56"
"InstallVer"="56"
2-Activate Technician Edition x86.reg
Windows Registry Editor Version 5.00[HKEY_LOCAL_MACHINE\SOFTWARE\EASEUS\EPM\Key]
"Key"="www.PirateCity.NET"
[HKEY_LOCAL_MACHINE\SOFTWARE\EASEUS\EPM\Version]
"Flag"="57"
"InstallVer"="57"
3-Activate Server Edition x86.reg
Windows Registry Editor Version 5.00[HKEY_LOCAL_MACHINE\SOFTWARE\EASEUS\EPM\Key]
"Key"="www.PirateCity.NET"
[HKEY_LOCAL_MACHINE\SOFTWARE\EASEUS\EPM\Version]
"Flag"="54"
"InstallVer"="54"
4-Activate Professional Edition x86.reg
Windows Registry Editor Version 5.00
[HKEY_LOCAL_MACHINE\SOFTWARE\EASEUS\EPM\Key]
"Key"="www.PirateCity.NET"
[HKEY_LOCAL_MACHINE\SOFTWARE\EASEUS\EPM\Version]
"Flag"="52"
"InstallVer"="52"
5-Activate Free Edition Home x86.reg
Windows Registry Editor Version 5.00
[HKEY_LOCAL_MACHINE\SOFTWARE\EASEUS\EPM\Key]
"Key"="www.PirateCity.NET"
[HKEY_LOCAL_MACHINE\SOFTWARE\EASEUS\EPM\Version]
"Flag"="58"
"InstallVer"="58"
1-Activate Unlimitted Edition x64.reg
[HKEY_LOCAL_MACHINE\SOFTWARE\Wow6432Node\EASEUS\EPM\Key]
"Key"="www.PirateCity.NET"
[HKEY_LOCAL_MACHINE\SOFTWARE\Wow6432Node\EASEUS\EPM\Version]
"Flag"="56"
"InstallVer"="56"
2-Activate Technician Edition x64.reg
Windows Registry Editor Version 5.00
[HKEY_LOCAL_MACHINE\SOFTWARE\Wow6432Node\EASEUS\EPM\Key]
"Key"="www.PirateCity.NET"
[HKEY_LOCAL_MACHINE\SOFTWARE\Wow6432Node\EASEUS\EPM\Version]
"Flag"="57"
"InstallVer"="57"
3-Activate Server Edition x64.reg
Windows Registry Editor Version 5.00
[HKEY_LOCAL_MACHINE\SOFTWARE\Wow6432Node\EASEUS\EPM\Key]
"Key"="www.PirateCity.NET"
[HKEY_LOCAL_MACHINE\SOFTWARE\Wow6432Node\EASEUS\EPM\Version]
"Flag"="54"
"InstallVer"="54"
4-Activate Professional Edition x64.reg
Windows Registry Editor Version 5.00
[HKEY_LOCAL_MACHINE\SOFTWARE\Wow6432Node\EASEUS\EPM\Key]
"Key"="www.PirateCity.NET"
[HKEY_LOCAL_MACHINE\SOFTWARE\Wow6432Node\EASEUS\EPM\Version]
"Flag"="52"
"InstallVer"="52"
5-Activate Free Edition Home x64.reg
Windows Registry Editor Version 5.00
[HKEY_LOCAL_MACHINE\SOFTWARE\Wow6432Node\EASEUS\EPM\Key]
"Key"="www.PirateCity.NET"
[HKEY_LOCAL_MACHINE\SOFTWARE\Wow6432Node\EASEUS\EPM\Version]
"Flag"="58"
"InstallVer"="58"


បង្កើនទំហំ USB ជាមួយកម្មវិធី​ SDATA Tool

បង្កើនទំហំ USB ជាមួយកម្មវិធី​ SDATA Tool

 កម្មវិធី​ SDATA Tool​​ ជាកម្មវិធីដែលអាចភូតនូវទំហំផ្ទុករបស់ USB ដោយវា Format USB ជា
ប្រព័ន្ធឯកសារ FAT32 ដែលអ្នកអាចមើលឃើញទំហំខុសគ្នាបានក្នុង Windows Explorer
តែវាមិនអាចភូតទំហំពិតនៅពេលដែលអ្នកបើកកម្មវិធីផ្សេងទៀត។

--->Download

ដ្រាយ  H ជាទំហំផ្ទុករបស់​​​​​​ USB​ដើមរបស់ខ្ញុំ  វាមានចំណុះផ្ទុក ២ ជ.ក មុនប្រើ កម្មវិធី SDATA
The H letter drive is my USB drive.It has the capacity 2 Gb which is viewed in the Windows Explorer before using SDATA application.


1-After downloading via the above link ,Please run SDATA application by right click and click on Run as Administrator


2-ចូរជ្រើសរើស ដ្រាយ យូអេសប៊ី (Choose the USB drive letter )


3-សូមចុចលើ​ប៊ូតុង E-Compress NOW រួចរងចាំរហូតដល់ចប់ដោយជោគជ័យ
(Click on E-Compress NOW​ and wait until it processes and finishes successfully)


4-សូមមើលលទ្ធផលនៅក្នុងផ្ទាំងវីនដូរ អ៊េចផ្ល​ រ វាបង្ហាញនូវទំហំវាកើនឡើងដល់​៤ ជ.ក
 (the capacity is increased twice )


ប៉ុន្តែចំណុះផ្ទុកនេះវាមិនអាចភូតបានទេបើអ្នកបើកកម្មវិធីផ្សេងទៀតមើលដូចជា Disk Manager របស់វីនដូវ ដោយបើកផ្ទាំង Run​  វាយ diskmgmt.msc រួច OK វានឹងបង្ហាញឌូចរូបខាងក្រោម៖
(To see the real capacity of USB drive after using SDATA application you just run Disk Manager )


AllMyTube.v4.3.2.3


កម្មវិធីជំនាញខាងទាញយកបទចម្រៀង និង វិដេអូពី យូធូប និងបម្លែងជាបទចម្រៀងគ្រប់ប្រភេទ​

AllMyTube.v4.3.2.3


 Features:
  • This Application can download videos not only from YouTube, but it also from the video sharing sites .
  • Convert downloaded and existing videos to all popular video formats / audio and devices.
  • You can play and manage all downloaded  videos without any other player Apps.
  • It also Breakpoint Download and lets you resume the download at the previous stop point .
  • 1-click Download & Convert lets you automatically convert to all format types of music and video files.

--->Download

របៀបបង្កើត​ USB ប៊ូតតម្លើងប្រព័ន្ធប្រតិបត្តិការ វីនដូ


របៀបបង្កើត​ USB ប៊ូតតម្លើងប្រព័ន្ធប្រតិបត្តិការ វីនដូ

ជាមួយនឹងកម្មវិធី ឧបករណ៍ទាញយកវីនដូតាម USB/DVD

How to create Windows Bootable USB/DVD Drive with the Windows USB/DVD Download tool

ជាដំបូងអ្នកត្រូវដម្លើងកម្មវិធី នេះជាមុនសិន   ចុចត្រង់នេះដើម្បីទាញយក
Firstly, You have to install this application,   Click to download it
បន្ទាប់មកសូមអនុវត្តន៍តាមជំហានខាងក្រោម៖
Ii order to create a Bootable USB Drive with the above application ,please practice the following:
1-insert your USB flash drive

then You will see the USB drive Letter Show like the picture


2-Run the Application
then Click OK
 
 
3-Click Browse to Open and mount ISO source file of Windows OS


 4-Next, click USB Device
5-Then select the USB flash drive Letter you want to use.

6-Click Begin Copying, then, wait while the flash drive is formatted and the Windows 8 ISO is copied over to create your bootable USB flash drive.

 
 7-When it’s done, you’ll see it’s been created successfully and the progress bar is at 100%.


5-Press Window key+E ,In the Widow Explorer you’ll see your USB flash drive like this.


My facebook Page

Blogger Tips and TricksLatest Tips For BloggersBlogger Tricks

My Photo Profile

Powered by Blogger.

ផ្នែកដែលបានជ្រើសរើស

Blogger news

បញ្ជីតាមផ្នែក Category List

Recent Posts

About